
DEBVisDic Manual
For developers: DEBVisDic server API, (DEB)VisDic Wordnet format
Manual for creating your own WordNet: here.
How to obtain a DEBVisDic account
- go to http://nlp.fi.muni.cz/declaration/
- fill in the form, print it, sign it and send it to the NLP Centre
- in reply you will obtain login and password (for free)
First start
- if you're using Chrome or Firefox web browser, you need to add an exception rule to unblock pop-up windows for this website: https://abulafia.fi.muni.cz:9001/editor/
- if you already have credentials, go to here and log in
Choose WordNets
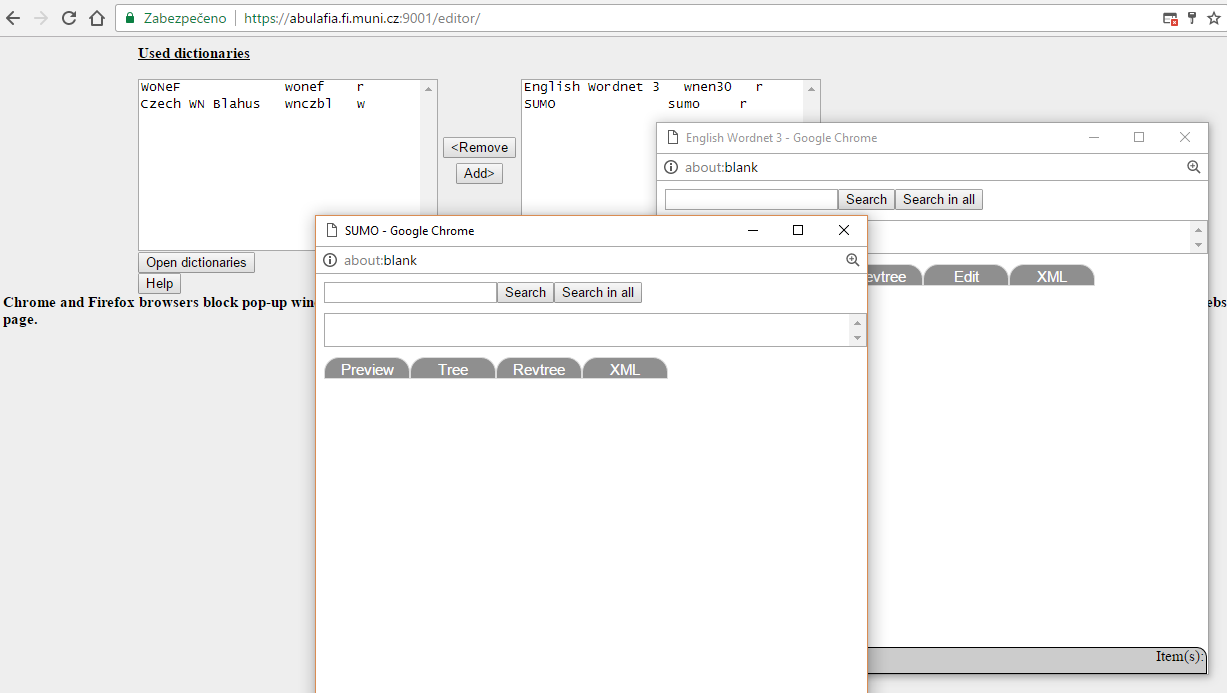
select packages → click Add → click Open dictionaries → WordNet(s) open(s)
- In the editor view (on picture below), the left dropdown list contains all WordNets available to you. Select packages you want to use (Ctrl+click, Shift+click to select multiple packages) and click the Add button. Chosen packages are moved to the list on the right. All packages listed here are the ones which you are about to work with.
- Click Open dictionaries button and a new window with the first selected WordNet (from the right list) will open. If you have multiple packages in your selection, click Open dictionaries button as many times as you have dictionaries. Another window will open for each of them. E.g. if you have selected 3 packages, click Open dictionaries button 3 times.
Now you have everything set up and you can start working.
Interface description (main components)
Keep in mind that each WordNet client is opened in a separate window.
Each window has the following components:
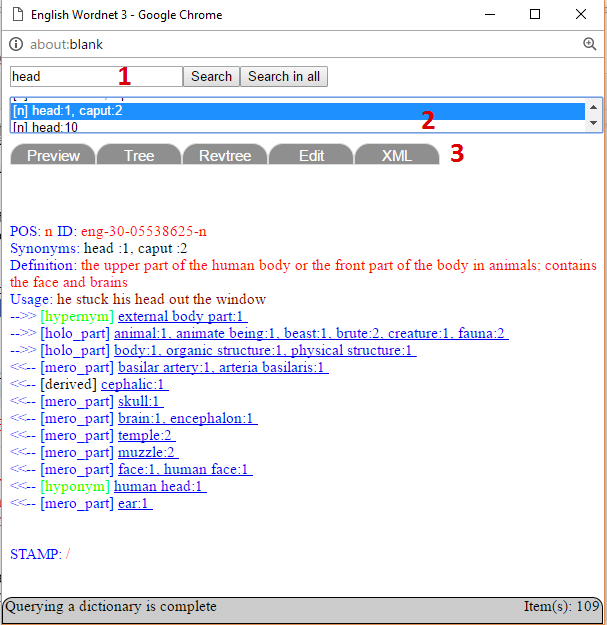
| Search query (1) | Enter the search query into this box (previously used queries are automatically offered). The Search button will run the query only in the actual WordNet window, while the Search in all will run the same query in all open windows. Query possibilities are listed in section Search, queries. |
| Result list (2) | List of synsets found as a result of the query. Each line represents one synset - PoS and list of literals. Click on a synset to display detailed information in bottom part of the window. |
| Synset information (3) | This part of window contains several tabs, by clicking on them you will get detailed information about the selected synset. |
Synset information, tabs
| Preview | Text preview of a given synset. When you click on a synset link (for example hypernym), linked synset is selected and its information is displayed. |
| Tree | Hypernym/hyponym tree related to the given synset. By default, the selected synset is displayed plus all the hypernyms up to the top most one. By clicking on the [+] button in front of a synset name in the tree, the synset hyponyms are displayed. You can also click on the [-] button to hide tree levels below. When you click on [+] again, all hyponyms of synset are displayed. |
| Rev(ersed)Tree | Basically, the same tree as above, just reversed upside-down. This time, hyponyms are up and hypernyms down. This reversed tree is needed since the hypero/hyponymy relations form a general graph structure, not just a simple tree. |
| Edit | A form for synset editing and adding new synsets, see section Editing functionality. |
| XML | The synset data displayed in XML format. |
Search, queries
You can use several types of queries, from the basic ones to the advanced. The last one can be used easily as an automated query: Inter-WordNet functions.
| word | search for entries containing whole word in literals |
| example: dog (give you all synsets with “dog” in literals; even multiword literals) | |
| word: | search for an exact literal |
| example: dog: (find all synsets with literal “dog”; exactly this one word) | |
| word:number | search for entries containing the exact literal (all PoS) |
| example: dog:5 (find exactly this one synset) | |
| xml_element=value | search for value of xml_element |
| example: SYNSET.POS=n (find all nouns); SYNSET.DOMAIN=zoology (find all entries with this domain) | |
| xml_element=dictionary_code2:entry_id2:xml_element2 | for all synsets with given value in element SYNSET.SUMO. This is used mostly in automatic AutoLookup queries. |
| example: CONCEPT.ID=wnen30:eng-30-00147502-b:SYNSET.SUMO |
In SUMO WordNet you can use special character (*) to display its content grouped into categories.
There are more xml_elements than mentioned in examples. This set differs for each WordNet. You can see all available elements by clicking on the XML tab.
Inter-WordNet functions
Usually, WordNets are connected using InterLanguage Identifiers (in some form, e.g. ID links). If you right-click in synset information part of a WordNet window, you see the dictionary context menu (see picture).
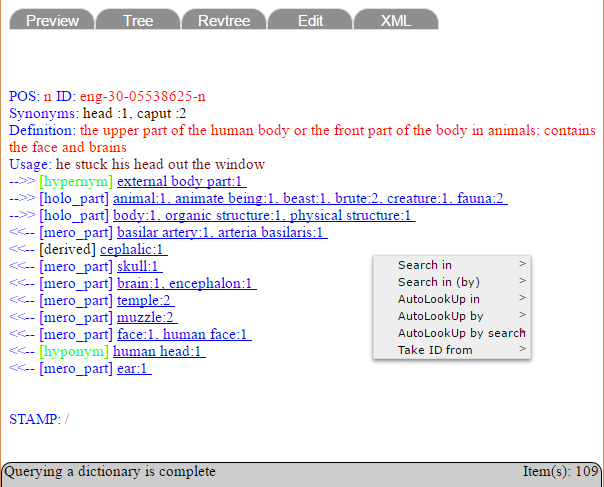
Now, let us have a look at the first five menu entries. They make your searching much easier. (The last one is related to editing functionality: Inter-WordNet functions - linking to other WordNets.)
| Show in | allows you to display entry with the same ID in another WordNet, for example see an entry linked to the English synset in Czech WordNet (it can be useful for translations). When you select this menu item, you will see list of dictionaries connected to the current one. When you click on a dictionary name, the linked synset is displayed in the selected dictionary. |
| Show in (by) | is similar, but uses different elements to link between entries. For example, you can display SUMO entry for the SUMO information stored in synset (as SYNSET.SUMO). |
| AutoLookUp in | works similar to Show in and lasts for all future queries. When you click on a dictionary name, a tick appears (or disappears) in front of the name. When you select another synset in current dictionary, all the ticked dictionaries are automatically updated to show entry with the same ID. For example: in English WordNet you tick AutoLookUp in Czech and Polish WordNets. Whenever you select a synset in the English WN (by clicking in result list, on a link in preview or on a synset in tree), the Czech and Polish synsets are automatically displayed. |
| AutoLookUp in (by) | is a combination of Show in (by) and AutoLookUp in. |
| AutoLookUp by search | whenever you search in actual dictionary, the same query is automatically run in all ticked dictionaries. |
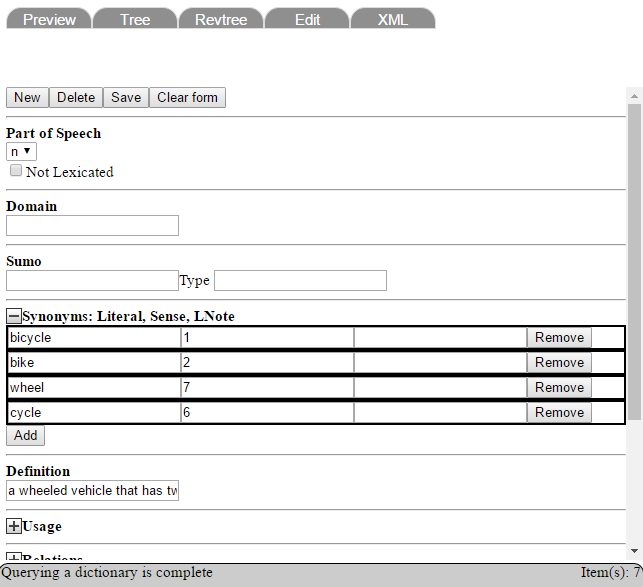
Editing functionality (Edit tab)
Writing a new synset
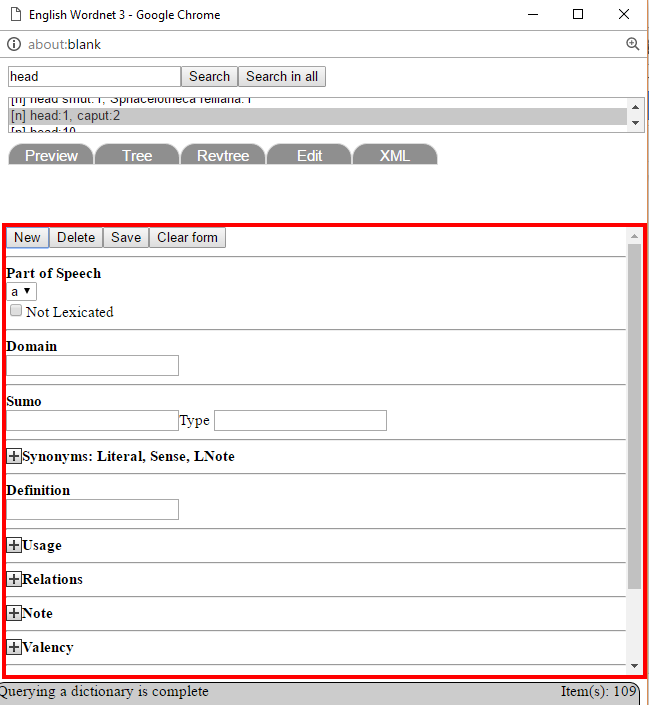
click on Edit tab → New → choose Part of speech → type Synonym(s) → click Save
To create a new synset, choose the Edit tab and click the New button. You'll see red border around the form - this means that you are editing new entry, not an existing one.
In the form, you can see several boxes with labels and + buttons, for example Synonyms or Relations. When you click on the + button, a box will open with a group of form fields. The + button changes to - button, which you can use to hide the box if you feel the form is too complex.
For a new synset, you have to select at least Part of Speech and a synonym - click on Add button to add more synonyms. Don't forget to fill literal and sense number for each synonym. You can also fill in other information, like Definition, Usage or Relations.
When you are done, do not forget to click on Save button.
There are also some good advices about How to write a synset.
Changing an existing synset
click on Edit tab → rewrite/remove Synonym(s) → click Save
Click on + next to Synonyms and you can rewrite or remove individual literals.
Editing relations
click Edit tab → type Relation(s) → Enter → select synset → select relation type → click Save
Click the Add button in Relations box to add new relation form fields. At first, a query resulting into the target synset must be constructed.
Write the query (e.g. “dog”; see queries) to the first box, press Enter (Select option displays) and select target synset from a dropdown list, which you could open by button on the right of the first box (this is important). If WordNet does not contain the typed entry, No options displays and you should type different query.
Select relation type in the second box. When adding hyponym/hypernym relations, add the hypernym of the synset only. Hyponyms are generated automatically.

Inter-WordNet functions - linking to other WordNets
Let us have a look at the last one of the Inter-WordNet functions.
| Take ID from | changes ID (used as ILI) of the selected synset to the value of synset ID in the selected dictionary. You can use this function to link several dictionaries to a central one. For example, create a new Czech synset, find the appropriate English equivalent and in the Czech WN select Take ID from English WordNet. Synsets are connected with the same ID/ILI and you can display them using Show and Autolookup functions. |
Locking synsets
When you start editing a synset, it is locked for you so no one else can make changes to this synset.
Export data
You can export data (in XML) from any WordNet available to you. Log in here using your credentials.
Eq_Relations, IL relations, ILI
Export data
- Synset
- a set of one or more word(s), or phrases, with the same meaning (=synonyms)
- Literal
- exactly one word, or phrase; a set of literals with the same meaning is synset
- Sense
- one of the meanings of a word, meaning is differ based on the context
- Interlingual (IL) relations
- synonymy: words or phrases with the same, or nearly the same, meaning
- antonymy: words with the opposite meaning
- hyperonymy/hyponymy: words with superior/inferior meaning (color/green)
- Interlingual Index (ILI)
- language independent set of indices; defines the meaning and link to its source, like ID
- Equivalent relations (EQ_relations)
- between linked synsets; allow you to compare individual WordNets
- Set of Base Concepts
- the most important meanings, same for all WordNets
- Top Ontology
- shows significant semantic differences